Recording a website performance test for The Grinder using Chrome DevTools
The Grinder load testing framework is a good tool for stress testing your website or application. It can run tests in parallel on multiple machines, allowing you to check how your application would behave under heavy load. This makes it possible to determine your app's weak points, so you can proceed to optimize them. Unfortunately the TCPProxy component provided with The Grinder sometimes produces flawed testing scripts. I created a simple tool called har2grinder, which produces Grinder test scripts from HAR files. This allows you to record a browsing session using Chrome's DevTools and then run it in the Grinder.
HTTP Archive (HAR) files
The HTTP Archive (HAR) format is able to store a history of HTTP transactions. This allows a web browser to export detailed performance data about web pages it loads. This format is currently a work in progress at the W3C.
Chrome's DevTools allow you to save a history of your browsing including every HTTP request made by the browser during your session. We can convert this record to a script which The Grinder will run multiple times.
Creating a HAR file using Chrome DevTools
-
Fire up Chrome and open the DevTools.
-
Click the Settings icon
 in the bottom right corner and Disable the cache.
 -
Open the Network tab of the DevTools.
-
Clear the Network history

-
Choose the option to Preserve Log upon navigation
 (circle icon turns red).
 -
Navigate around your site.
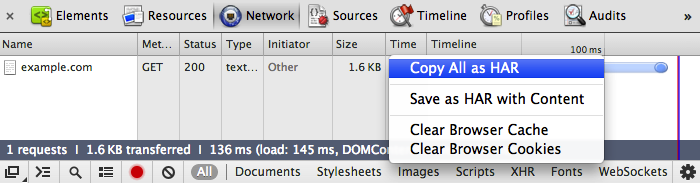
Copy your recorded browser session in HAR format
- After you navigate to the pages you want to test, right-click on the network history panel and choose Copy All as HAR. Save the clipboard to a
.harfile.
Creating a test script for The Grinder from a HAR file
Download the har2grinder script from Github.
To convert your recorded navigation to a Grinder test, simply run the har2grinder script and redirect its output to a .py file.
$ python har2grinder.py my_website_test.har > my_website_grinder_test.py
Running tests in The Grinder
Information about using The Grinder can be found in it's user guide. Essentially it boils down to:
- Download Grinder binaries from SourceForge
-
Start a GUI console to control your tests using a command such as:
$ java -classpath lib/grinder.jar net.grinder.Console -
Grinder agents are the programs which will connect to your website during tests. On the same machine, another machine or a set of machines create a file called
grinder.properties, which will contain the configuration for Grinder's agents.
# Which test do you wish to run
grinder.script=my_website_grinder_test.py
# How many tests do you want to run in parallel
grinder.processes=2
grinder.threads=100
# How many times to repeat them
grinder.runs=5
# Specify the IP and port of the host running the console
grinder.consoleHost=127.0.0.1
grinder.consolePort=6372
# Enable logging of test runs for debugging
grinder.logDirectory=log
grinder.numberOfOldLogs=2
...and start the agent processes:
$ java -classpath lib/grinder.jar net.grinder.Grinder grinder.properties
You can now run your performance tests from the Grinder console.