Setting up an asynchronous task queue for Django using Celery and Redis
Celery is a powerful, production-ready asynchronous job queue, which allows you to run time-consuming Python functions in the background. A Celery powered application can respond to user requests quickly, while long-running tasks are passed onto the queue. In this article we will demonstrate how to add Celery to a Django application using Redis.
Note
Celery uses a broker to pass messages between your application and Celery worker processes. In this article we will set up Redis as the message broker. You should note that persistence is not the main goal of this data store, so your queue could be erased in the event of a power failure or other crash. Keep this in mind and don't use the job queue to store application state. If you need your queue to be have persistence, use another message broker such as RabbitMQ.
Prerequisites
In this article we will add Celery to a Django application running in a Python virtualenv. I will assume that the virtual environment is located in the directory /webapps/hello_django/ and that the application is up an running. You can follow steps in my previous article to set up Django in virtualenv running on Nginx and Gunicorn.
This article was tested on a server running Debian 7, so everything should also work on an Ubuntu server or other Debian-based distribution. If you're using an RPM-based distro (such as CentOS), you will need to replace the aptitude commands by their yum counterparts and if you're using FreeBSD you can install the components from ports. If you don't have a server to play with, I can recommend the inexpensive VPS servers offered by Digital Ocean.
Update your system
Let's get started by making sure your system is up to date.
$ sudo aptitude update
$ sudo aptitude upgrade
Install Redis
The first piece of software we'll install is Redis.
$ sudo aptitude install redis-server
$ redis-server --version
Redis server version 2.4.14 (00000000:0)
Check if Redis is up and accepting connections:
$ redis-cli ping
PONG
Installing Celery in your aplication's virtualenv
Let's add Celery to your application's virtual Python environment.
First we'll switch to the application user and activate the virtualenv
$ sudo su - hello
hello@django:~$ source bin/activate
Now we can use pip to install Celery along with its Redis bindings and dependencies:
(hello_django)hello@django:~$ pip install celery[redis]
Downloading/unpacking celery[redis]
(...)
Successfully installed celery pytz billiard kombu redis anyjson amqp
Cleaning up...
Setting up Celery support in your Django application
In order to use Celery as part of your Django application you'll need to create a few files and tweak some settings. Let's start by adding Celery-related configuration variables to settings.py
# CELERY SETTINGS
BROKER_URL = 'redis://localhost:6379/0'
CELERY_ACCEPT_CONTENT = ['json']
CELERY_TASK_SERIALIZER = 'json'
CELERY_RESULT_SERIALIZER = 'json'
Now we'll create a file named celery.py, which will instantiate Celery, creating a so called Celery application. You can find more information about available Celery application settings in the documentation.
from __future__ import absolute_import

import os
from celery import Celery
from django.conf import settings

# set the default Django settings module for the 'celery' program.
os.environ.setdefault('DJANGO_SETTINGS_MODULE', 'hello.settings')

app = Celery('hello_django')

# Using a string here means the worker will not have to
# pickle the object when using Windows.
app.config_from_object('django.conf:settings')
app.autodiscover_tasks(lambda: settings.INSTALLED_APPS)
In order to instantiate the Celery app every time our Django application is started, we can add the following lines to the __init__.py file in our Django proj.proj module. This will make sure that celery task use this app.
from __future__ import absolute_import
from .celery import app as celery_app
Create your first tasks
We will now add an app called testapp to our Django project and add some tasks to this app. Let's start by creating the app:
(hello_django)hello@django:~/hello$ python manage.py startapp testapp
Make sure that the app is added to INSTALLED_APPS in settings.py
Create a file called tasks.py in your apps's directory and add the code of your first Celery task to the file.
from __future__ import absolute_import

from celery import shared_task

@shared_task
def test(param):
    return 'The test task executed with argument "%s" ' % param
Find more information about writing task functions in the docs.
If you created all files as outlined above, you should see the following directory structure:
/webapps/hello_django/hello
├── hello
│   ├── celery.py       # The Celery app file
│   ├── __init__.py     # The project module file we modified
│   ├── settings.py     # Settings go here, obviously :)
│   ├── urls.py
│   └── wsgi.py
├── manage.py
└── testapp
    ├── __init__.py
    ├── models.py
    ├── tasks.py        # File containing tasks for this app
    ├── tests.py
    └── views.py
You can find a complete sample Django project on Celery's GitHub.
Testing the setup
In production we will want Celery workers to be daemonized, but let's just quickly start the workers to check that everything is configured correctly. Use the celery command located in your virtualenv's bin directory to start the workers. Make sure that the module path hello.celery:app is available on your PYTHONPATH.
Note
It's important to understand how Celery names tasks which it discovers and how these names are related to Python module paths. If you run into NotRegistered or ImportError exceptions make sure that your apps and tasks are imported in a consistent manner and your PYTHONPATH is set correctly.
$ export PYTHONPATH=/webapps/hello_django/hello:$PYTHONPATH $ /webapps/hello_django/bin/celery --app=hello.celery:app worker --loglevel=INFO
-------------- celery@django v3.1.11 (Cipater) ---- * ----- --- * *** * -- Linux-3.2.0-4-amd64-x86_64-with-debian-7.5 -- * - --- - ** ---------- [config] - ** ---------- .> app: hello_django:0x15ae410 - ** ---------- .> transport: redis://localhost:6379/0 - ** ---------- .> results: disabled - *** --- * --- .> concurrency: 2 (prefork) -- ** ---- --- *** ----- [queues] -------------- .> celery exchange=celery(direct) key=celery
[tasks]
  . testapp.tasks.test
[2014-05-20 13:53:59,740: INFO/MainProcess] Connected to redis://localhost:6379/0 [2014-05-20 13:53:59,748: INFO/MainProcess] mingle: searching for neighbors [2014-05-20 13:54:00,756: INFO/MainProcess] mingle: all alone [2014-05-20 13:54:00,769: WARNING/MainProcess] celery@django ready.
If everything worked, you should see a splash screen similar to the above and the [tasks] section should list tasks discovered in all the apps of your project.
[tasks]
. testapp.tasks.test
Submitting a task to the queue for execution
In another terminal, activate the virtualenv and start a task from your project's shell.
$ sudo su - hello
hello@django:~$ source bin/activate
(hello_django)hello@django:~$ cd hello/
(hello_django)hello@django:~/hello$ python manage.py shell
Python 2.7.3 (default, Mar 13 2014, 11:03:55)
[GCC 4.7.2] on linux2
Type "help", "copyright", "credits" or "license" for more information.
(InteractiveConsole)
>>> from testapp.tasks import test
>>> test.delay('This is just a test!')
<AsyncResult: 79e35cf7-0a3d-4786-b746-2d3dd45a5c16>
You should see messages appear in the terminal where Celery workers are started:
[2014-05-18 11:43:24,801: INFO/MainProcess] Received task: testapp.tasks.test[79e35cf7-0a3d-4786-b746-2d3dd45a5c16]
[2014-05-18 11:43:24,804: INFO/MainProcess] Task testapp.tasks.test[79e35cf7-0a3d-4786-b746-2d3dd45a5c16] succeeded in 0.00183034200018s: u'The test task executed with argument "This is just a test!" '
You can find more information about calling Celery tasks in the docs.
Running Celery workers as daemons
In production we can use supervisord to start Celery workers and make sure they are restarted in case of a system reboot or crash. Installation of Supervisor is simple:
$ sudo aptitude install supervisor
When Supervisor is installed you can give it programs to start and watch by creating configuration files in the /etc/supervisor/conf.d directory. For our hello-celery worker we'll create a file named /etc/supervisor/conf.d/hello-celery.conf with this content:
[program:hello-celery]
command=/webapps/hello_django/bin/celery --app=hello.celery:app worker --loglevel=INFO
directory=/webapps/hello_django/hello
user=hello
numprocs=1
stdout_logfile=/webapps/hello_django/logs/celery-worker.log
stderr_logfile=/webapps/hello_django/logs/celery-worker.log
autostart=true
autorestart=true
startsecs=10

; Need to wait for currently executing tasks to finish at shutdown.
; Increase this if you have very long running tasks.
stopwaitsecs = 600

; When resorting to send SIGKILL to the program to terminate it
; send SIGKILL to its whole process group instead,
; taking care of its children as well.
killasgroup=true

; if rabbitmq is supervised, set its priority higher
; so it starts first
priority=998
This configuration is based on a sample config provided by the makers of Celery. You can set many other options.
Create a file to store your application's log messages:
hello@django:~$ mkdir -p /webapps/hello_django/logs/
hello@django:~$ touch /webapps/hello_django/logs/celery-worker.log
After you save the configuration file for your program you can ask supervisor to reread configuration files and update (which will start your the newly registered app).
$ sudo supervisorctl reread
hello-celery: available
$ sudo supervisorctl update
hello-celery: added process group
You can now monitor output of Celery workers by following the celery-worker.log file:
$ tail -f /webapps/hello_django/logs/celery-worker.log
You can also check the status of Celery or start, stop or restart it using supervisor.
$ sudo supervisorctl status hello
hello                            RUNNING    pid 18020, uptime 0:00:50
$ sudo supervisorctl stop hello
hello: stopped
$ sudo supervisorctl start hello
hello: started
$ sudo supervisorctl restart hello
hello: stopped
hello: started
Celery workers should now be automatically started after a system reboot and automatically restarted if they ever crashed for some reason.
Inspecting worker tasks
You can check that Celery is running by issuing the celery status command:
$ export PYTHONPATH=/webapps/hello_django/hello:$PYTHONPATH
$ /webapps/hello_django/bin/celery --app=hello.celery:app status
celery@django: OK

1 node online.
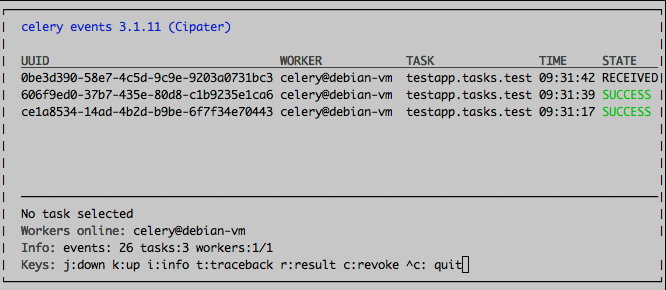
You can also inspect the queue using a friendly curses monitor:
$ export PYTHONPATH=/webapps/hello_django/hello:$PYTHONPATH
$ /webapps/hello_django/bin/celery --app=hello.celery:app control enable_events
$ /webapps/hello_django/bin/celery --app=hello.celery:app events
I hope that's enough to get you started. You should probably read the Celery User Guide now. Happy coding!