Building beautiful REST APIs using Flask, Swagger UI and Flask-RESTPlus
This article outlines steps needed to create a REST API using Flask and Flask-RESTPlus. These tools combine into a framework, which automates common tasks:
- API input validation
- formatting output (as JSON)
- generating interactive documentation (with Swagger UI)
- turning Python exceptions into machine-readable HTTP responses
Flask
Flask is a web micro-framework written in Python. Since it's a micro-framework, Flask does very little by itself. In contrast to a framework like Django, which takes the "batteries included" approach, Flask does not come with an ORM, serializers, user management or built-in internationalization. All these features and many others are available as Flask extensions, which make up a rich, but loosely coupled ecosystem.
The challenge, then, for an aspiring Flask developer lies in picking the right extensions and combining them together to get just the right set of functions. In this article we will describe how to use the Flask-RESTPlus extension to create a Flask-based RESTful JSON API.
Flask-RESTPlus
Flask-RESTPlus aims to make building REST APIs quick and easy. It provides just enough syntactic sugar to make your code readable and easy to maintain. Its killer feature is the ability to automatically generate interactive documentation for your API using Swagger UI.
Swagger UI
Swagger UI is part of a suite of technologies for documenting RESTful web services. Swagger has evolved into the OpenAPI specification, currently curated by the Linux Foundation. Once you have an OpenAPI description of your web service, you can use software tools to generate documentation or even boilerplate code (client or server) in a variety of languages. Take a look at swagger.io for more information.
Swagger UI is a great tool for describing and visualizing RESTful web services. It generates a small webpage, which documents your API and allows you to make test queries using JavaScript. Click here to see a small demo.
In this article we'll describe how to use Flask and Flask-RESTPlus to create a RESTful API which comes equipped with Swagger UI.
Getting started
To show off the features of Flask-RESTPlus I prepared a small demo application. It's a part of an API for a blogging platform, which allows you to manage blog posts and categories.
Let's start by downloading and running this demo on your system, then we'll walk through the code.
Prerequisites
You will need to have Python with Virtualenv and Git installed on your machine.
I would recommend using Python 3, but Python 2 should work just fine.
Setting up the demo application
To download and start the demo application issue the following commands. First clone the application code into any directory on your disk:
$ cd /path/to/my/workspace/
$ git clone https://github.com/postrational/rest_api_demo
$ cd rest_api_demo
Create a virtual Python environment in a directory named venv, activate the virtualenv and install required dependencies using pip:
$ virtualenv -p `which python3` venv
$ source venv/bin/activate
(venv) $ pip install -r requirements.txt
Now let's set up the app for development and start it:
(venv) $ python setup.py develop
(venv) $ python rest_api_demo/app.py
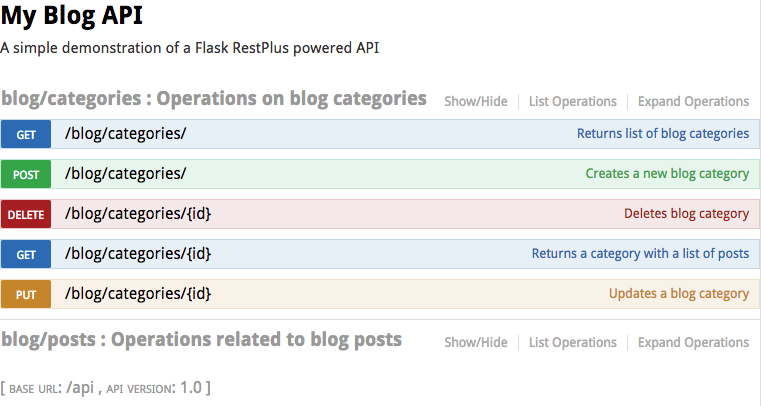
OK, everything should be ready. In your browser, open the URL http://localhost:8888/api/
You should be greeted with a page similar to the following.
Defining your Flask app and RESTPlus API
Flask and Flask-RESTPlus make it very easy to get started. Minimal code required to create a working API is just 10 lines long.
from flask import Flask
from flask_restplus import Resource, Api

app = Flask(__name__)                  #  Create a Flask WSGI application
api = Api(app)                         #  Create a Flask-RESTPlus API

@api.route('/hello')                   #  Create a URL route to this resource
class HelloWorld(Resource):            #  Create a RESTful resource
    def get(self):                     #  Create GET endpoint
        return {'hello': 'world'}

if __name__ == '__main__':
    app.run(debug=True)                #  Start a development server
To make the code more maintainable, in our demo application we separate the app definition, API methods and other types of code into separate files. The following directory tree shows where each part of the logic is located.
├── api                         #
│   ├── blog                    #  Blog-related API directory
│   │   ├── business.py         #
│   │   ├── endpoints           #  API namespaces and REST methods
│   │   │   ├── categories.py   #
│   │   │   └── posts.py        #
│   │   ├── parsers.py          #  Argument parsers
│   │   └── serializers.py      #  Output serializers
│   └── restplus.py             #  API bootstrap file
├── app.py                      #  Application bootstrap file
├── database                    #
│   └── models.py               #  Definition of SQLAlchemy models
├── db.sqlite                   #
└── settings.py                 #  Global app settings
The definition of the RESTPlus API is stored in the file rest_api_demo/api/restplus.py, while the logic for configuring and starting the Flask app is stored in rest_api_demo/app.py.
Take a look into the app.py file and the initialize_app function.
def initialize_app(flask_app):
    configure_app(flask_app)

    blueprint = Blueprint('api', __name__, url_prefix='/api')
    api.init_app(blueprint)
    api.add_namespace(blog_posts_namespace)
    api.add_namespace(blog_categories_namespace)
    flask_app.register_blueprint(blueprint)

    db.init_app(flask_app)
This function does a number of things, but in particular it sets up a Flask blueprint, which will host the API under the /api URL prefix. This allows you to separate the API part of your application from other parts. Your app's frontend could be hosted in the same Flask application but under a different blueprint (perhaps with the / URL prefix).
The RESTPlus API itself is also split into a number of separate namespaces. Each namespace has its own URL prefix and is stored in a separate file in the /api/blog/endpoints directory. In order to add these namespaces to the API, we need to use the api.add_namespace() function.
initialize_app also sets configuration values loaded from settings.py and configures the app to use a database through the magic of Flask-SQLAlchemy.
Defining API namespaces and RESTful resources
Your API will be organized using API namespaces, RESTful resources and HTTP methods. Namespaces, as described above, allow your API definitions to be split into multiple files, each defining a part of the API with a different URL prefix.
RESTful resources are used to organize the API into endpoints corresponding to different types of data used by your application. Each endpoint is called using a different HTTP method. Each method issues a different command to the API. For example, GET is used to fetch a resource from the API, PUT is used to update its information, DELETE to delete it.
GET /blog/categories/1- Retrieve category with ID 1PUT /blog/categories/1- Update the category with ID 1DELTE /blog/categories/1- Delete the category with ID 1
Resources usually have an associated collection endpoint, which can be used to create new resources (POST) or fetch lists (GET).
GET /blog/categories- Retrieve a list of categoriesPOST /blog/categories- Create a new category
Using Flask-RESTPlus you can define an API for all of the endpoints listed above with the following block of code. We start by creating a namespace, we create a collection, a resource and associated HTTP methods.
ns = api.namespace('blog/categories', description='Operations related to blog categories')


@ns.route('/')
class CategoryCollection(Resource):

    def get(self):
        """Returns list of blog categories."""
        return get_all_categories()

    @api.response(201, 'Category successfully created.')
    def post(self):
        """Creates a new blog category."""
        create_category(request.json)
        return None, 201


@ns.route('/<int:id>')
@api.response(404, 'Category not found.')
class CategoryItem(Resource):

    def get(self, id):
        """Returns details of a category."""
        return get_category(id)

    @api.response(204, 'Category successfully updated.')
    def put(self, id):
        """Updates a blog category."""
        update_category(id, request.json)
        return None, 204

    @api.response(204, 'Category successfully deleted.')
    def delete(self, id):
        """Deletes blog category."""
        delete_category(id)
        return None, 204
The api.namespace() function creates a new namespace with a URL prefix. The description field will be used in the Swagger UI to describe this set of methods.
The @ns.route() decorator is used to specify which URLs will be associated with a given resource. You can specify path parameters using angle brackets, such as in @ns.route('/<int:id>').
You can optionally specify the type of parameter using the the name of a converter and colon. Available converters are string: (default), path: (string with slashes), int:, float: and uuid:.
Note
URL converters come from the Werkzeug library on which Flask is based. You can read more about them in Werkzeug docs. Unfortunately not all Werkzeug converter options are currently supported by Flask-RESTPlus. Additional types can be added using Flask's url_map option.
Each resource is a class which contains functions which will be mapped to HTTP methods. The following functions are mapped: get, post, put, delete, patch, options and head.
If a docstring is present in any function, it will be displayed in the Swagger UI as "Implementation Notes". You can use Markdown syntax to format these notes.
You can use the @api.response() decorator to list what HTTP status codes each method is expected to return and what the status code means.
Once all this code is in place, your method will be nicely documented in the Swagger UI.
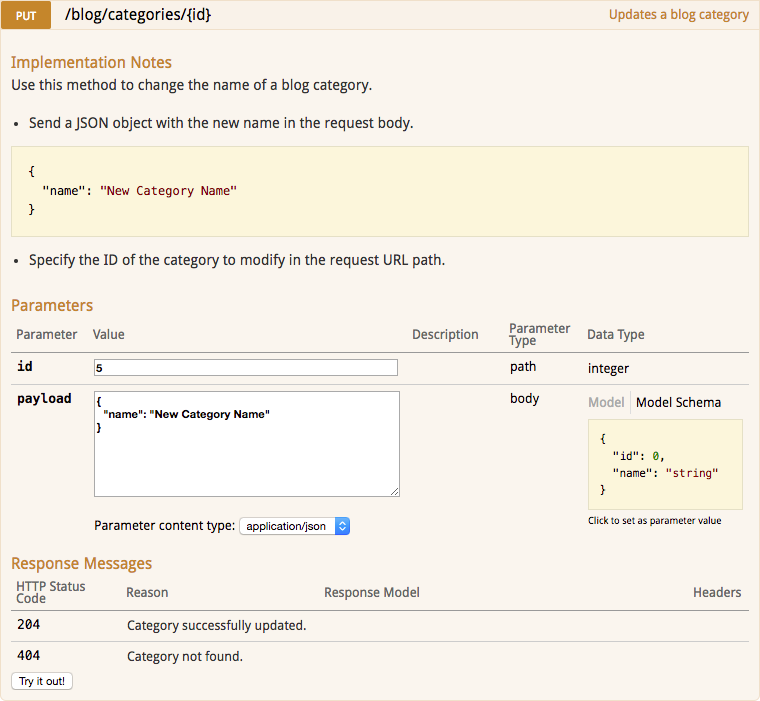
Swagger UI documentation also includes a form in which parameters can be set. If a request body is expected, its format will be specified on the right.
If you hit the Try it out! button, your request will be sent to the API and the response will be displayed on screen.
Documenting and validating method parameters
We already mentioned path parameters above, but you can also document parameters in the request query (after the ? in the URL), the headers or in the form submitted in the request body.
In order to define these parameters, we use an object called the RequestParser. The parser has a function named add_argument(), which allows us to specify what the parameter is named and what its allowed values are.
from flask_restplus import reqparse

pagination_arguments = reqparse.RequestParser()
pagination_arguments.add_argument('page', type=int, required=False)
pagination_arguments.add_argument('per_page', type=int, required=False,
                                  choices=[5, 10, 20, 30, 40, 50], default=10)
Once defined, we can use the @api.expect decorator to attach the parser to a method.
@ns.route('/')
class PostsCollection(Resource):

    @api.expect(pagination_arguments, validate=True)
    def get(self):
        ...
Once the method is decorated with an argument parser, the method's Swagger UI will display a form to specify argument values.
Validating argument values
The argument parser serves another function, it can validate the argument values. If a value fails validation, the API will return an HTTP 400 error with an appropriate message.
{
    "errors": {
        "per_page": "Results per page 3 is not a valid choice"
    },
    "message": "Input payload validation failed"
}
You can enable or disable argument validation for each method using the validate argument in the @api.expect method. You can also enable validation globally by using the RESTPLUS_VALIDATE configuration variable when bootstrapping your Flask application.
In the demo application we enable validation globally in the app.py file.
Argument options
To specify the argument's type use the type keyword. Allowed values are int, str and bool.
You can specify arguments to be present in the query of your method, but also in the headers or request body using the location keyword.
parser.add_argument('headers', location='headers')
parser.add_argument('form', location='form')
parser.add_argument('json', location='json')
To create an argument which accepts multiple values, use the action keyword and specify 'append' as value:
To specify a list of valid argument values, use the choices keyword and provide an iterator as value.
Read more about RequestParser in the Flask-RESTPlus docs.
Documenting and validating request JSON objects
If you want to update or create a new resource in a RESTful collection, you should send the item's data serialized as JSON in the body of a request. Flask-RESTPlus allows you to automatically document and validate the format of incoming JSON objects by using API models.
A RESTPlus API model defines the format of an object by listing all expected fields. Each field has an associated type (e.g. String, Integer, DateTime), which determines what values will be considered valid.
The demo app has a number of API models in the serializers.py file. A simple example would look something like this:
from flask_restplus import fields
from rest_api_demo.api.restplus import api

blog_post = api.model('Blog post', {
    'id': fields.Integer(description='The unique identifier of a blog post'),
    'title': fields.String(required=True, description='Article title'),
    'body': fields.String(required=True, description='Article content'),
    'status': fields.String(required=True, enum=['DRAFT', 'PUBLISHED', 'DELETED']),
    'pub_date': fields.DateTime,
})
Once the model is defined you can attach it to a method using the @api.expect() decorator.
@ns.route('/')
class BlogPostCollection(Resource):

    @api.response(201, 'Blog post successfully created.')
    @api.expect(blog_post)
    def post(self):
        ...
Field options
All fields share some common options which can change their behavior:
required- is the field requireddefault- default value for the fielddescription- field description (will appear in Swagger UI)example- optional example value (will appear in Swagger UI)
Additional validation options can be added to fields to make them more specific:
String:
min_lengthandmax_length- minimum and maximum length of a stringpattern- a regular expression, which the sting must match
Numbers (Integer, Float, Fixed, Arbitrary):
minandmax- minimum and maximum valuesexclusiveMinandexclusiveMax- as above, but the boundary values are not validmultiple- number must be a multiple of this value
You can learn more about RESTPlus model fields, by looking at their source code.
Nested models and lists
A field of an API model may use another model as its expected value. You would then provide a JSON object as a valid value for this field.
A field may also require a list of values, or even a list of nested objects.
Model inheritance
If you have two similar models, you may use model inheritance to extend the definition of a model with additional fields. In the example below we have one generic API model called pagination and we create a more specific model page_of_blog_posts by using the api.inherit() method.
pagination = api.model('A page of results', {
    'page': fields.Integer(description='Number of this page of results'),
    'pages': fields.Integer(description='Total number of pages of results'),
    'per_page': fields.Integer(description='Number of items per page of results'),
    'total': fields.Integer(description='Total number of results'),
})

page_of_blog_posts = api.inherit('Page of blog posts', pagination, {
    'items': fields.List(fields.Nested(blog_post))
})
Marshaling output JSON objects
API models can also be used as serializers. If you decorate a method with @api.marshal_with(model), Flask-RESTPlus will generate a JSON object with the same fields as are specified in the model.
The method just has to return an object which has attributes with the same names as the fields. Alternatively, the method could return a dictionary with values assigned to the same keys as the names of model fields.
For example, your method can return an SQLAlchemy ORM object which has the same fields as your API model.
    @ns.route('/<int:id>')
    @api.response(404, 'Category not found.')
    class CategoryItem(Resource):

        @api.marshal_with(category_with_posts)
        def get(self, id):
            """
            Returns a category with a list of posts.
            """
            return Category.query.filter(Category.id == id).one()
If you want to return a list of objects, use the @api.marshal_list_with(model) decorator.
The attribute keyword allows you specify which object attribute the field value should be taken from:
Using the attribute parameter you can pull out a value nested deeper in the object's structure:
In more complex cases you can use a lambda function to query for the value:
Handling errors
When writing your API endpoint functions you may find yourself handling a request that cannot be fulfilled. In such cases your only recourse it to return an error message to the user. You can use the api.abort() function to do so.
In cases where you don't explicitly handle the error yourself, Flask will catch the exception and turn it into an HTTP 500 error page.
You can override the default error handler using the @api.errorhandler decorator.
@api.errorhandler
def default_error_handler(e):
    message = 'An unhandled exception occurred.'
    log.exception(message)

    if not settings.FLASK_DEBUG:
        return {'message': message}, 500
You can specify custom error handling logic for different types of exceptions.
@api.errorhandler(NoResultFound)
def database_not_found_error_handler(e):
    log.warning(traceback.format_exc())
    return {'message': 'A database result was required but none was found.'}, 404
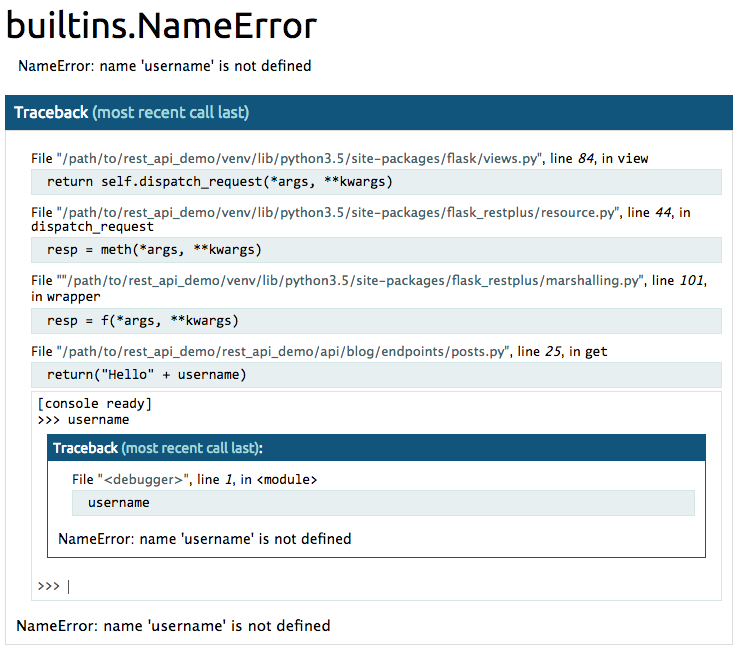
The default_error_handler function as written above will not return any response if the Flask application is running in DEBUG mode. Instead of returning an error message, this will activate the Werkzeug interactive debugger.
Resetting the database
If you delete the db.sqlite file or simply want to reset your database to an empty state, you can enter the following commands in your Python console.
>>> from rest_api_demo.app import initialize_app, app
>>> from rest_api_demo.database import reset_database
>>>
>>> initialize_app(app)
>>> with app.app_context():
...     reset_database()
Further reading
There are a lot of resources on the net which can guide you to full Flask enlightenment. I would recommend getting to know the following:
- Flask docs
- Flask-RESTPlus docs
- Flask-SQLAlchemy docs and SQLAlchemy Tutorial - for more information about using a database with Flask
- Flask Extensions Registry - for more useful Flask extensions
- Rest API Design Rulebook