Apache Airflow is an open-source tool for orchestrating complex computational workflows and data processing pipelines. If you find yourself running cron task which execute ever longer scripts, or keeping a calendar of big data processing batch jobs then Airflow can probably help you. This article provides an introductory tutorial for people who want to get started writing pipelines with Airflow.
An Airflow workflow is designed as a directed acyclic graph (DAG). That means, that when authoring a workflow, you should think how it could be divided into tasks which can be executed independently. You can then merge these tasks into a logical whole by combining them into a graph.
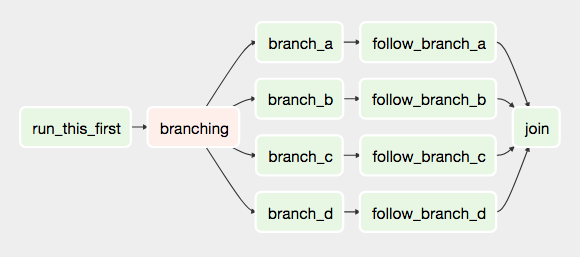
The shape of the graph decides the overall logic of your workflow. An Airflow DAG can include multiple branches and you can decide which of them to follow and which to skip at the time of workflow execution.
This creates a very resilient design, because each task can be retried multiple times if an error occurs. Airflow can even be stopped entirely and running workflows will resume by restarting the last unfinished task.
When designing Airflow operators, it’s important to keep in mind that they may be executed more than once. Each task should be idempotent, i.e. have the ability to be applied multiple times without producing unintended consequences.
Airflow nomenclature
Here is a brief overview of some terms used when designing Airflow workflows:
- Airflow DAGs are composed of Tasks.
- Each Task is created by instantiating an Operator class. A configured instance of an Operator becomes a Task, as in:
my_task = MyOperator(...). - When a DAG is started, Airflow creates a DAG Run entry in its database.
- When a Task is executed in the context of a particular DAG Run, then a Task Instance is created.
AIRFLOW_HOMEis the directory where you store your DAG definition files and Airflow plugins.
| When? | DAG | Task | Info about other tasks |
|---|---|---|---|
| During definition | DAG | Task | get_flat_relatives |
| During a run | DAG Run | Task Instance | xcom_pull |
| Base class | DAG |
BaseOperator |
Airflow documentation provides more information about these and other concepts.
Prerequisites
Airflow is written in Python, so I will assume you have it installed on your machine. I’m using Python 3 (because it’s 2017, come on people!), but Airflow is supported on Python 2 as well. I will also assume that you have virtualenv installed.
$ python3 --version
Python 3.6.0
$ virtualenv --version
15.1.0
Install Airflow
Let’s create a workspace directory for this tutorial, and inside it a Python 3 virtualenv directory:
$ cd /path/to/my/airflow/workspace
$ virtualenv -p `which python3` venv
$ source venv/bin/activate
(venv) $
Now let’s install Airflow 1.8:
(venv) $ pip install airflow==1.8.0
Now we’ll need to create the AIRFLOW_HOME directory where your DAG definition files and Airflow plugins will be stored. Once the directory is created, set the AIRFLOW_HOME environment variable:
(venv) $ cd /path/to/my/airflow/workspace
(venv) $ mkdir airflow_home
(venv) $ export AIRFLOW_HOME=`pwd`/airflow_home
You should now be able to run Airflow commands. Let’s try by issuing the following:
(venv) $ airflow version
  ____________       _____________
 ____    |__( )_________  __/__  /________      __
____  /| |_  /__  ___/_  /_ __  /_  __ \_ | /| / /
___  ___ |  / _  /   _  __/ _  / / /_/ /_ |/ |/ /
 _/_/  |_/_/  /_/    /_/    /_/  \____/____/|__/
   v1.8.0rc5+apache.incubating
If the airflow version command worked, then Airflow also created its default configuration file airflow.cfg in AIRFLOW_HOME:
airflow_home
├── airflow.cfg
└── unittests.cfg
Default configuration values stored in airflow.cfg will be fine for this tutorial, but in case you want to tweak any Airflow settings, this is the file to change. Take a look at the docs for more information about configuring Airflow.
Initialize the Airflow DB
Next step is to issue the following command, which will create and initialize the Airflow SQLite database:
(venv) $ airflow initdb
The database will be create in airflow.db by default.
airflow_home
├── airflow.cfg
├── airflow.db        <- Airflow SQLite DB
└── unittests.cfg
Using SQLite is an adequate solution for local testing and development, but it does not support concurrent access. In a production environment you will most certainly want to use a more robust database solution such as Postgres or MySQL.
Start the Airflow web server
Airflow’s UI is provided in the form of a Flask web application. You can start it by issuing the command:
(venv) $ airflow webserver
You can now visit the Airflow UI by navigating your browser to port 8080 on the host where Airflow was started, for example: http://localhost:8080/admin/
Airflow comes with a number of example DAGs. Note that these examples may not work until you have at least one DAG definition file in your own dags_folder. You can hide the example DAGs by changing the load_examples setting in airflow.cfg.
Your first Airflow DAG
OK, if everything is ready, let’s start writing some code. We’ll start by creating a Hello World workflow, which does nothing other then sending “Hello world!” to the log.
Create your dags_folder, that is the directory where your DAG definition files will be stored in AIRFLOW_HOME/dags. Inside that directory create a file named hello_world.py.
airflow_home
├── airflow.cfg
├── airflow.db
├── dags                <- Your DAGs directory
│   └── hello_world.py  <- Your DAG definition file
└── unittests.cfg
Add the following code to dags/hello_world.py:
1 2 3 4 5 6 7 8 9 10 11 12 13 14 15 16 17 | |
This file creates a simple DAG with just two operators, the DummyOperator, which does nothing and a PythonOperator which calls the print_hello function when its task is executed.
Running your DAG
In order to run your DAG, open a second terminal and start the Airflow scheduler by issuing the following commands:
$ cd /path/to/my/airflow/workspace
$ export AIRFLOW_HOME=`pwd`/airflow_home
$ source venv/bin/activate
(venv) $ airflow scheduler
The scheduler will send tasks for execution. The default Airflow settings rely on an executor named SequentialExecutor, which is started automatically by the scheduler. In production you would probably want to use a more robust executor, such as the CeleryExecutor.
When you reload the Airflow UI in your browser, you should see your hello_world DAG listed in Airflow UI.

In order to start a DAG Run, first turn the workflow on (arrow 1), then click the Trigger Dag button (arrow 2) and finally, click on the Graph View (arrow 3) to see the progress of the run.
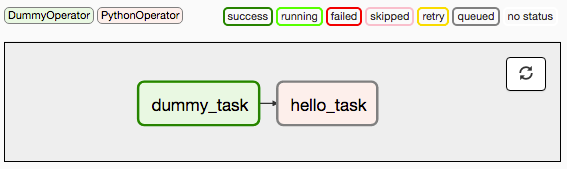
You can reload the graph view until both tasks reach the status Success. When they are done, you can click on the hello_task and then click View Log. If everything worked as expected, the log should show a number of lines and among them something like this:
[2017-03-19 13:49:58,789] {base_task_runner.py:95} INFO - Subtask: --------------------------------------------------------------------------------
[2017-03-19 13:49:58,789] {base_task_runner.py:95} INFO - Subtask: Starting attempt 1 of 1
[2017-03-19 13:49:58,789] {base_task_runner.py:95} INFO - Subtask: --------------------------------------------------------------------------------
[2017-03-19 13:49:58,790] {base_task_runner.py:95} INFO - Subtask:
[2017-03-19 13:49:58,800] {base_task_runner.py:95} INFO - Subtask: [2017-03-19 13:49:58,800] {models.py:1342} INFO - Executing <Task(PythonOperator): hello_task> on 2017-03-19 13:49:44.775843
[2017-03-19 13:49:58,818] {base_task_runner.py:95} INFO - Subtask: [2017-03-19 13:49:58,818] {python_operator.py:81} INFO - Done. Returned value was: Hello world!
The code you should have at this stage is available in this commit on GitHub.
Your first Airflow Operator
Let’s start writing our own Airflow operators. An Operator is an atomic block of workflow logic, which performs a single action. Operators are written as Python classes (subclasses of BaseOperator), where the __init__ function can be used to configure settings for the task and a method named execute is called when the task instance is executed.
Any value that the execute method returns is saved as an Xcom message under the key return_value. We’ll cover this topic later.
The execute method may also raise the AirflowSkipException from airflow.exceptions. In such a case the task instance would transition to the Skipped status.
If another exception is raised, the task will be retried until the maximum number of retries is reached.
Remember that since the execute method can retry many times, it should be idempotent.
We’ll create your first operator in an Airflow plugin file named plugins/my_operators.py. First create the airflow_home/plugins directory, then add the my_operators.py file with the following content:
1 2 3 4 5 6 7 8 9 10 11 12 13 14 15 16 17 18 19 20 21 22 | |
In this file we are defining a new operator named MyFirstOperator. Its execute method is very simple, all it does is log “Hello World!” and the value of its own single parameter. The parameter is set in the __init__ function.
We are also defining an Airflow plugin named MyFirstPlugin. By defining a plugin in a file stored in the airflow_home/plugins directory, we’re providing Airflow the ability to pick up our plugin and all the operators it defines. We’ll be able to import these operators later using the line from airflow.operators import MyFirstOperator.
In the docs, you can read more about Airflow plugins.
Make sure your PYTHONPATH is set to include directories where your custom modules are stored.
Now, we’ll need to create a new DAG to test our operator. Create a dags/test_operators.py file and fill it with the following content:
1 2 3 4 5 6 7 8 9 10 11 12 13 14 15 | |
Here we just created a simple DAG named my_test_dag with a DummyOperator task and another task using our new MyFirstOperator. Notice how we pass the configuration value for my_operator_param here during DAG definition.
At this stage your source tree will look like this:
airflow_home
├── airflow.cfg
├── airflow.db
├── dags
│   └── hello_world.py
│   └── test_operators.py  <- Second DAG definition file
├── plugins
│   └── my_operators.py    <- Your plugin file
└── unittests.cfg
All the code you should have at this stage is available in this commit on GitHub.
To test your new operator, you should stop (CTRL-C) and restart your Airflow web server and scheduler. Afterwards, go back to the Airflow UI, turn on the my_test_dag DAG and trigger a run. Take a look at the logs for my_first_operator_task.
Debugging an Airflow operator
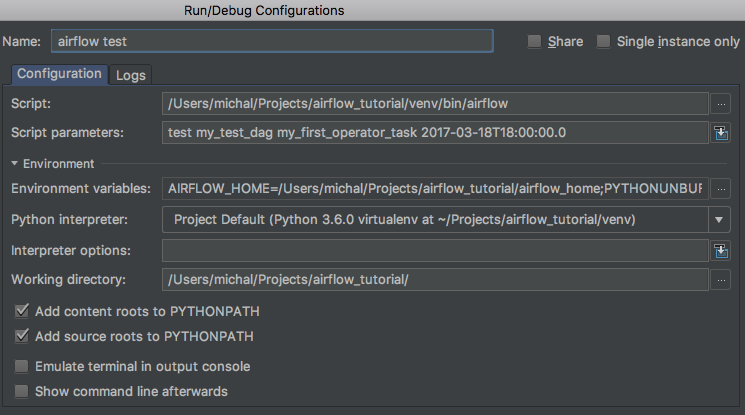
Debugging would quickly get tedious if you had to trigger a DAG run and wait for all upstream tasks to finish before you could retry your new operator. Thankfully Airflow has the airflow test command, which you can use to manually start a single operator in the context of a specific DAG run.
The command takes 3 arguments: the name of the dag, the name of a task and a date associated with a particular DAG Run.
(venv) $ airflow test my_test_dag my_first_operator_task 2017-03-18T18:00:00.0
You can use this command to restart you task as many times as needed, while tweaking your operator code.
If you want to test a task from a particular DAG run, you can find the needed date value in the logs of a failing task instance.
Debugging an Airflow operator with IPython
There is a cool trick you can use to debug your operator code. If you install IPython in your venv:
(venv) $ pip install ipython
You can then place IPython’s embed() command in your code, for example in the execute method of an operator, like so:
1 2 3 4 5 6 | |
Now when you run the airflow test command again:
(venv) $ airflow test my_test_dag my_first_operator_task 2017-03-18T18:00:00.0
the task will run, but execution will stop and you will be dropped into an IPython shell, from which you can explore the place in the code where you placed embed():
1 2 3 4 5 6 7 8 9 10 11 12 13 14 15 16 17 18 19 20 21 22 23 24 25 26 27 28 29 30 31 32 | |
You could of course also drop into Python’s interactive debugger pdb (import pdb; pdb.set_trace()) or the IPython enhanced version ipdb (import ipdb; ipdb.set_trace()). Alternatively, you can also use an airflow test based run configuration to set breakpoints in IDEs such as PyCharm.
Code is in this commit on GitHub.
Your first Airflow Sensor
An Airflow Sensor is a special type of Operator, typically used to monitor a long running task on another system.
To create a Sensor, we define a subclass of BaseSensorOperator and override its poke function. The poke function will be called over and over every poke_interval seconds until one of the following happens:
pokereturnsTrue– if it returnsFalseit will be called again.pokeraises anAirflowSkipExceptionfromairflow.exceptions– the Sensor task instance’s status will be set to Skipped.pokeraises another exception, in which case it will be retried until the maximum number ofretriesis reached.
There are many predefined sensors, which can be found in Airflow’s codebase:
To add a new Sensor to your my_operators.py file, add the following code:
1 2 3 4 5 6 7 8 9 10 11 12 13 14 15 16 17 | |
Here we created a very simple sensor, which will wait until the the current minute is a number divisible by 3. When this happens, the sensor’s condition will be satisfied and it will exit. This is a contrived example, in a real case you would probably check something more unpredictable than just the time.
Remember to also change the plugin class, to add the new sensor to the operators it exports:
1 2 3 | |
You can now place the operator in your DAG:
1 2 3 4 5 6 7 8 9 10 11 12 13 14 15 16 17 18 | |
Restart your webserver and scheduler and try out your new workflow.
If you click View log of the my_sensor_task task, you should see something similar to this:
[2017-03-19 14:13:28,719] {base_task_runner.py:95} INFO - Subtask: --------------------------------------------------------------------------------
[2017-03-19 14:13:28,719] {base_task_runner.py:95} INFO - Subtask: Starting attempt 1 of 1
[2017-03-19 14:13:28,720] {base_task_runner.py:95} INFO - Subtask: --------------------------------------------------------------------------------
[2017-03-19 14:13:28,720] {base_task_runner.py:95} INFO - Subtask:
[2017-03-19 14:13:28,728] {base_task_runner.py:95} INFO - Subtask: [2017-03-19 14:13:28,728] {models.py:1342} INFO - Executing <Task(MyFirstSensor): my_sensor_task> on 2017-03-19 14:13:05.651721
[2017-03-19 14:13:28,743] {base_task_runner.py:95} INFO - Subtask: [2017-03-19 14:13:28,743] {my_operators.py:34} INFO - Current minute (13) not is divisible by 3, sensor will retry.
[2017-03-19 14:13:58,747] {base_task_runner.py:95} INFO - Subtask: [2017-03-19 14:13:58,747] {my_operators.py:34} INFO - Current minute (13) not is divisible by 3, sensor will retry.
[2017-03-19 14:14:28,750] {base_task_runner.py:95} INFO - Subtask: [2017-03-19 14:14:28,750] {my_operators.py:34} INFO - Current minute (14) not is divisible by 3, sensor will retry.
[2017-03-19 14:14:58,752] {base_task_runner.py:95} INFO - Subtask: [2017-03-19 14:14:58,752] {my_operators.py:34} INFO - Current minute (14) not is divisible by 3, sensor will retry.
[2017-03-19 14:15:28,756] {base_task_runner.py:95} INFO - Subtask: [2017-03-19 14:15:28,756] {my_operators.py:37} INFO - Current minute (15) is divisible by 3, sensor finishing.
[2017-03-19 14:15:28,757] {base_task_runner.py:95} INFO - Subtask: [2017-03-19 14:15:28,756] {sensors.py:83} INFO - Success criteria met. Exiting.
Code is in this commit on GitHub.
Communicating between operators with Xcom
In most workflow scenarios downstream tasks will have to use some information from an upstream task. Since each task instance will run in a different process, perhaps on a different machine, Airflow provides a communication mechanism called Xcom for this purpose.
Each task instance can store some information in Xcom using the xcom_push function and another task instance can retrieve this information using xcom_pull. The information passed using Xcoms will be pickled and stored in the Airflow database (xcom table), so it’s better to save only small bits of information, rather then large objects.
Let’s enhance our Sensor, so that it saves a value to Xcom. We’re using the xcom_push() function which takes two arguments – a key under which the value will be saved and the value itself.
1 2 3 4 5 6 7 8 9 | |
Now in our operator, which is downstream from the sensor in our DAG, we can use this value, by retrieving it from Xcom. Here we’re using the xcom_pull() function providing it with two arguments – the task ID of the task instance which stored the value and the key under which the value was stored.
1 2 3 4 5 6 7 8 9 | |
Final version of the code is in this commit on GitHub.
If you trigger a DAG run now and look in the operator’s logs, you will see that it was able to display the value created by the upstream sensor.
In the docs, you can read more about Airflow XComs.
I hope you found this brief introduction to Airflow useful. Have fun developing your own workflows and data processing pipelines!