Setting up Jenkins as a continuous integration server for Django
Jenkins is an easy-to-use open-source continuous integration server. In this post we'll go through steps needed to set up Jenkins to deploy your Django application and run unit tests whenever someone commits code to your project's repository. If the new code causes any of your tests to fail, Jenkins will send the commiter an email alert.
Prerequisites
In this post I will assume that you want to set up Jenkins on a Debian server named test-server. I will further assume that:
- the server is hosting a test version of your application at the URL
http://test-server - the application is running in a
virtualenvlocated in the directory/webapps/hello_django/ - the application code itself is located in
/webapps/hello_django/trunk/ - you're using an SVN repository located at
svn://svn-server/hello_django/trunk
Take a look at my previous post for more information about setting up Django in a virtualenv.
Installing Jenkins
Jenkins provides packages for most system distributions. Installation is very simple and consists of adding the Jenkins repository to your package system and installing the package. On Debian this can be performed using the following steps:
### Add the Jenkins repository to the list of repositories
$ sudo sh -c 'echo deb http://pkg.jenkins-ci.org/debian binary/ > /etc/apt/sources.list.d/jenkins.list'

### Add the repository's public key to your system's trusted keychain
$ wget -q -O - http://pkg.jenkins-ci.org/debian/jenkins-ci.org.key | sudo apt-key add -

### Download the repository index and install
$ sudo apt-get update
$ sudo apt-get install jenkins
Installation is very similar on other systems. For details take a look at the Jenkins installation docs.
By default Jenkins runs on port 8080 and listens on all network interfaces. After installing the package, you can visit Jenkins under the URL: http://test-server:8080
The default setup provides no security at all, so if your server is accessible outside of a trusted network you will need to secure it. Jenkins documentation describes a basic security setup, which you can extend by proxying Jenkins through your secured Apache or Nginx server, using HTTPs, etc.
Preparation steps
Since we will want Jenkins to deploy our application to the directory from which it runs, ie. /webapps/hello_django/trunk/, we will need to give the jenkins user access to write to this directory. We can do this by changing the directory's owner to jenkins for example:
$ sudo chown jenkins /webapps/hello_django/trunk/
If you want the jenkins user to restart your web or application server after a new version of your code is deployed, you should add an appropriate entry to your server's /etc/sudoers file, such as:
jenkins ALL=NOPASSWD: /usr/sbin/apachectl
On your SVN server create a user named jenkins with access to the source code of your project.
Creating a build configuration for your Django project
Making a new build configuration
- Navigate to your Jenkins installation and click New Item.
- Specify the name of the build you are creating, for example
hello-django-trunk - Select the Build a free-style software project option.
Configuring build location
- On the build configuration screen, click Advanced... in the Advanced Project Options section.
- Mark the checkbox Use custom workspace.
- Specify
/webapps/hello_django/trunk/as the Directory.
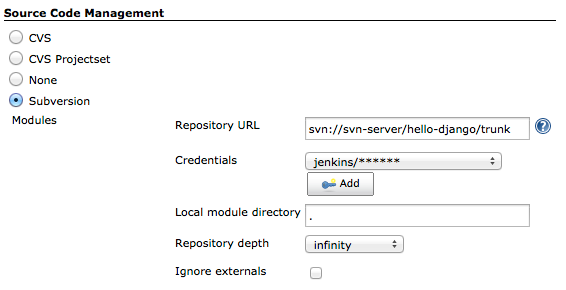
Configuring the source code repository
- In the Source Code Management section, select Subversion.
- Specify your Repository URL as
svn://svn-server/hello_django/trunk - Set Credentials to the username and password of the
jenkinsSVN user. - Set Local module directory to a single dot
.to indicate that we will be checking out code directly into the workspace directory.
Note
If you are using Git, you should install the Jenkins Git Plugin and use a Git URL for your repository instead.
Configuring build triggers
We will want Jenkins to deploy our application to the test server and run our tests after every commit. We can accomplish this, in at least two ways: a) we can ask Jenkins to periodically poll the SVN server for information about new commits, or b) we can add a post-commit hook to our repository to trigger a build after every commit remotely. The first option is easier to set up, but slightly wasteful, as we end up polling our source-code repository for information even during times when no one is working. Choose the option which suits your needs best.
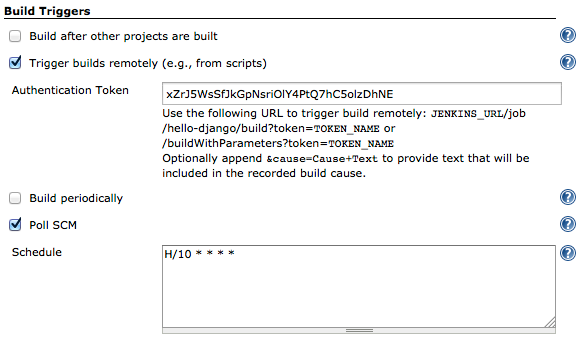
To configure polling of your source code repository every 10 minutes:
- Check the Poll SCM box in the Build Triggers section.
- Enter the following string as Schedule:
H/10 * * * *
Alternatively, to enable builds to be actively triggered by your source code repository's post-commit hook:
- Check the Trigger builds remotely (e.g., from scripts) box.
- Enter a long random string as the Authentication Token.
If you want builds to be triggered actively by your source code repository, you will need to create a script called post-commit (in the hooks directory of your SVN repo directory or the .git/hooks directory when using Git). Your hook script should execute a command such as curl to send an HTTP request to Jenkins which will trigger the build. The token is used here for security.
#!/bin/bash
curl http://test-server:8080/job/hello-django-trunk/build?token=xZrJ5WsSfJkGpNsriOlY4PtQ7hC5olzDhNE
Note
Once you set up Jenkins user authentication, the command above will not work. There is a plugin which can fix this. Note that when using this plugin the build trigger URL changes, so your command will have to be modified slightly.
#!/bin/bash
curl http://test-server:8080/buildByToken/build?job=hello-django-trunk&token=xZrJ5WsSfJkGpNsriOlY4PtQ7hC5olzDhNE
More information about using hooks: in SVN and Git.
The actual build script
Here we finally get to the meat of the matter. In the Build section we can enter all commands which should be executed to deploy our application to the test server and run tests.
- In the Build section click the Add build step button.
- Select Execute shell from the drop-down.
- Adjust the following script to your needs and enter it in the Command text area:
#!/bin/bash
source /webapps/hello_django/activate     # Activate the virtualenv
cd /webapps/hello_django/trunk/
pip install -r REQUIREMENTS.txt           # Install or upgrade dependencies
python manage.py migrate                  # Apply South's database migrations
python manage.py compilemessages          # Create translation files
python manage.py collectstatic --noinput  # Collect static files
sudo apachectl graceful                   # Restart the server, e.g. Apache
python manage.py test --noinput app1 app2 # Run the tests
Send emails when tests fail
If a commit causes our tests to fail, we want to alert the guilty commiter.
- In the Post-build Actions section click the Add post-build action button.
- Select E-mail Notification from the dropdown.
- Check the box Send separate e-mails to individuals who broke the build.
- Click Save the bottom of the screen.
Note
There is an important caveat here. Emails will be sent to addresses which combine the SVN username and a default domain suffix. This means that your users will need to have mailboxes (or aliases) in the same domain named as their SVN users are. For example, if my SVN username is michal, I would have to have the e-mail michal@email-server.
Set up Jenkins to send emails
- Navigate to Jenkins > Manage Jenkins > Configure System.
- Scroll down to the E-mail Notification section.
- Set Default user e-mail suffix to
@email-serverwhereemail-serveris the fully. qualified domain name of your organization's mail system. - Click the Advanced button and enter your SMTP server configuration to allow the Jenkins user to send email.
- Check the box Test configuration by sending test e-mail and send yourself a message to test the settings.
OK, we're done. From now on, whenever code is submitted to your repository, Jenkins should pick it up, deploy your Django application, run tests and alert the commiter if something he did broke a test.
Note
If your test server is available outside of your trusted network, make sure you proceed to lock it down tight.